WordPress plugin
If you use WordPress then we have a specific plug-in, which makes it even easier for you. If you prefer raw HTML you can use that with these details.
To embed planner: if you are using WordPress
There are five steps to installing the plug-in on your website:
1. Upload the influx folder to the /wp-content/plugins/ directory (start here: Influx WordPress Plug-in)

- Activate the plugin through the ‘Plugins’ menu in WordPress
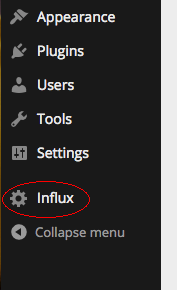
Now ‘Influx’ will appear in your WordPress menu:
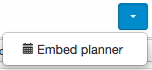
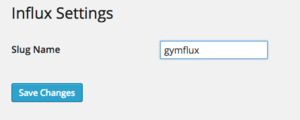
3. Enter your ‘slug’ from your Influx configuration on the Influx setup page in your WordPress install. You can get the unique slug in the planner by selecting the blue button in the top right of the screen then embed planner:
- Enter your specific slug in the Slug Name text box:
Before the next step, decide where on your website you could like the planner to appear.
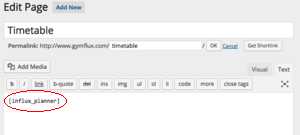
- On the selected page, use the short-code
[influx_planner](including the brackets).
Once saved, your Influx Planner will be embedded on your website.
To embed planner: if you are not using WordPress
Go to the planner, and in the top right is a blue button. Select this button and then ‘embed planner’:
This video shows you where to find the code to give to your website manager:
The next page provides two pieces of code:
-
one for the header section
-
one for the page where you wish the planner to appear